
The world of the bathroom is more and more “extended” and offers innovative solutions such as new waterproof wall panels to create walk-in showers yourself. In terms of shower coverings, designers are multiplying the concepts in order to offer you a variety of models that can meet each of your desires.
Some tips for installing Italian shower tiles
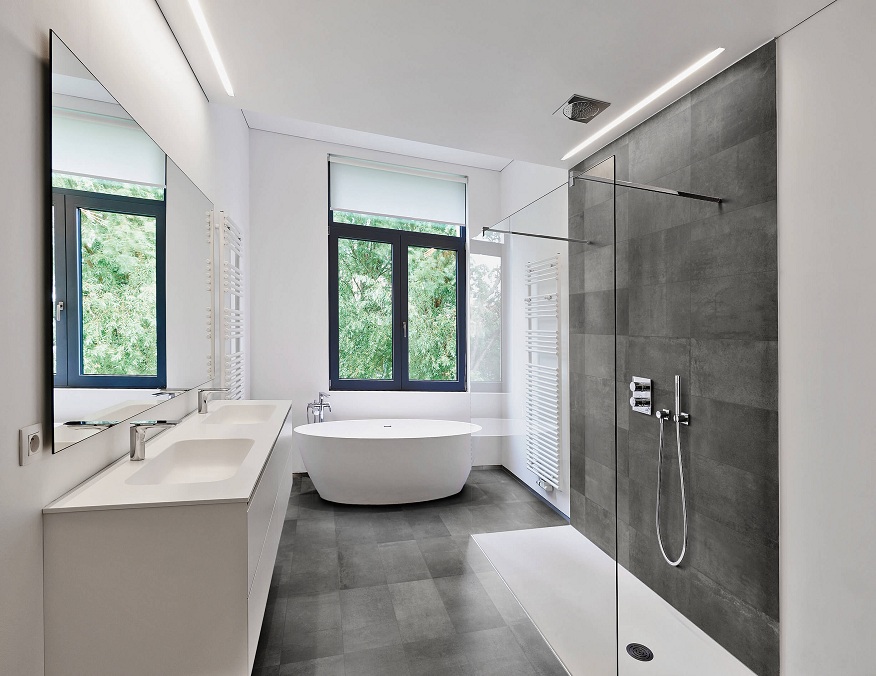
The walk-in shower (see our comparison ) is a bit like a shower roll. We have reported on it through many articles on ConsoBrico , and it must be recognized that you are always more numerous to ask us questions about its maintenance, and to share with us the problems you encounter , in particular with the receivers to be tiled , adapted to the installation of the Italian shower style.
If you have made the decision to lay the tiles yourself in your walk-in shower, we will first think of the waterproofing parameters. It is necessary to ensure optimal sealing so as not to end up with a flooded bathroom without knowing where the leak is coming from. Leakage issues can sometimes cost up to twice the price of a walk-in shower if not addressed properly.
Moreover, keep in mind that the installation is accessible to all DIYers with a little experience, but it requires a certain rigor so that your work is sustainable over time.
What is an Italian shower and what are its characteristics?
Accessibility, modernity and ease of maintenance, this is how we can succinctly summarize the advantages of a walk-in shower. If we compare it to the extra flat shower tray (see our extra flat shower tray guide ) we note the possibility of obtaining large formats (max 200x100cm with an extra flat) and above all to create linearity between the bathroom tiles and that of the shower itself, often the same. In others, the contrast will be deliberately created with a grating-style walk-in shower. In all cases we will seek the purity of the design by accompanying it with large format shower heads as well as a built-in shower column if we have the means.
The walk-in shower has thus become a real revolution for our bathrooms, in particular thanks to multiple supports that allow it to be easily installed like the panels to be tiled. You can thus select the coverings of the wall as well as the floor as you wish, which will allow you to adapt your shower harmoniously with the rest of your bathroom.
As we have seen previously, it is a shower whose floor is at the same level as that of your bathroom and which is slightly inclined to allow easy evacuation of water through the siphon. A 1% slope towards the siphon is generally recommended. To tile a walk-in shower, it will be imperative to start by tiling the floor and then the walls.
Before embarking on the installation of Italian shower tiling, it is necessary to prepare the walls well. Preparing the wall differs depending on which one you are going to work on:
If the walls are made of cement, first fill in the various holes and cracks with a special concrete filler and then sand until you obtain a smooth surface. Finish by washing the walls.
Before laying the tiles, it will also be necessary to carry out a layout plan, i.e. to calculate the exact number of tiles required according to the size of the tile and the surface to be tiled. Start by determining the point at which you will start tiling your shower and then mark the marks on the walls as well as on the floor. Be aware that the layout is not the same for the tiling on the floor as for the walls.
Installation of a tiling for Italian shower
We will see together the two different techniques for laying floor tiles and laying wall tiles. These techniques depend on the installation context in your bathroom (floor and wall, floor, or simply wall).
How to tile the floor? : The technique used for laying a tiled floor in a walk-in shower differs from that of a classic floor, which can be the floor of the rest of the bathroom, for example. Let us first note the imperative of horizontality, once again for reasons of watertightness. But horizontality here is entirely relative. If you notice that the horizontality of the tiles is not perfect, don’t worry! If you have installed the waterproofing membranes at the corners such as around the drain, watertightness will be guaranteed. As the shower floor is slightly inclined to allow water to drain, the tiles cannot be at the same level. In order to tile the walls as well, you need to start with the center of the shower and then gradually move towards the walls.
Make the joints to ensure the tightness of an Italian shower tile
After laying your tiles on the floor (or mosaic) as well as on the walls, make sure that the glue is completely dry before moving on to the next step which consists of making the seals to guarantee a better seal. the Italian shower as a whole. For this, it is first necessary to prepare the “joint mortar” which must first be applied to the tiles. Fill the various spaces between the tiles with mortar, then smooth them for a more aesthetic finish. Finally clean the tiles with clean water ) and abundantly – until the mortar residue has completely disappeared. For the most demanding among us, after drying we will iron with a toothbrush to eliminate all the small impurities which would not have been eliminated during rinsing.